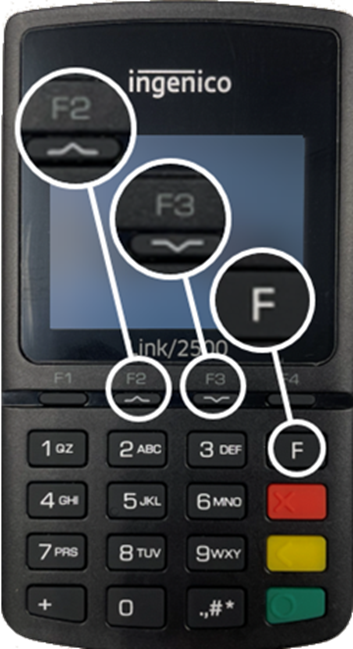
This article gives step-by-step instructions for configuring the Wi-Fi connection on the Ingenico Link/2500 wireless payment terminals:
Configure the Wi-Fi Connection on an Ingenico Link/2500
- Enter 2-6-3-4 using the keypad to access the terminal’s Admin Menu.
- Press the F function key when the message “Press F for Menu” appears on the screen.
- Press the down arrow (F3 Key) to select Tetra Admin.
- Press the Green (Enter) Key to open the Tetra Admin Menu.
- Press the down arrow (F3 Key) to select Terminal Settings.
- Press the Green (Enter) Key to open the Terminal Settings Menu.
- Press the down arrow (F3 Key) to select Comm Means.
- Press the Green (Enter) Key to open the Comm Means Menu.
- Press the down arrow (F3 Key) to select WiFi.
- Press the Green (Enter) Key to open the Wi-Fi Menu.
- Press the down arrow (F3 Key) to select Scan Networks.
- Press the Green (Enter) Key to open the list of available networks.
- Use the Up (F2) and Down (F3) arrow keys to select your Wi-Fi network from the list.
- Press the Green (Enter) Key to open the network settings.
- Enter your Wi-Fi password.
- Press the Green (Enter) Key.
- Press the Yellow (Previous) Key to exit through the menus until you return to the terminal’s home screen.
- Cycle Power on the terminal to complete the configuration.
Figure 1: Ingenico Link/2500 Terminal
